Tolerance Budgeting: Where to Spend and Where to Save

TL;DR
Treat tolerance as a budget you allocate across the whole part, not a value you set dimension by dimension. Start every dimension at a general tolerance (ISO 2768), then spend a tight band only where a fit, seal, bearing or mating interface genuinely needs it. Where a stack-up gives you a choice, put the tight tolerance on the cheaper feature to hold.
- Default first: ISO 2768-m or -f covers most non-functional dimensions at no cost premium.
- Spend on function: only fits, bearings, seals and datums earn a tight band.
- Cost climbs steeply: general to ±0.05 mm is modest; ±0.05 to ±0.01 mm can multiply the feature cost.
- Sendot standard: ±0.05 mm on critical features, tighter on specific features confirmed at quotation.
- Use the stack: let a stack-up tell you which dimension actually needs the tolerance.
- Quote in 12 hours: send a STEP file and we return a costed tolerance read-back.
Most drawings we quote are over-toleranced, and almost none are under-toleranced. That is not a coincidence. When an engineer sets tolerances dimension by dimension, the safe move on any single line is to tighten it — nobody was ever blamed for a part that fit too well. Do that a hundred times across a drawing and you have quietly tripled the inspection time and doubled the scrap risk on a part where maybe four dimensions actually mattered.
The fix is to stop thinking about tolerance one dimension at a time and start thinking about it as a fixed budget you allocate across the whole part. This article gives you a method for that allocation decision: which few dimensions deserve a tight band, which should be opened up, and how to decide when a stack-up gives you a choice. It assumes you already accept that tighter costs more — if you want that argument in full, see how tighter CNC part tolerances affect design and production. Here we take that as given and move to where the money should go.
The quick answer: default everything, then buy back the fits
The allocation method in one paragraph: set a general tolerance for the whole drawing in the title block — ISO 2768-m for typical machined work, -f if the part is genuinely precise — so every unlabelled dimension inherits a sensible band at no premium. Then walk the part and ask one question at each feature: does something physically mate, seal, rotate, locate or transmit load here? If yes, that feature is a candidate for a tighter individual callout. If no, leave it on the general tolerance and move on. You are not deciding what tolerance each dimension gets; you are deciding which handful of dimensions get pulled out of the default pool and given a bespoke, tighter band.
That single reframe — default pool plus a short list of exceptions — is what keeps a drawing cheap without making it loose. The rest of this article is how to build that short list well: how to read a stack-up so you tighten the right dimension, how the cost curve behaves so you know what you are spending, and a worked example so you can see the decisions land on a real part.
Why per-dimension tolerancing quietly bankrupts a drawing
When you tolerance dimension by dimension, every line item looks free in isolation. Tightening one bore from ±0.1 to ±0.02 mm feels like a small, prudent decision. The problem is that the cost of a tight tolerance is not paid at the drawing — it is paid on the shop floor, and it accumulates in ways the drawing does not show.
A tight band changes what happens to a feature in four places. It may force a finishing pass or a different tool where a roughing pass would have sufficed. It adds a dimension to the first-article and in-process inspection plan, often on a CMM rather than with hand gauges. It raises the scrap rate, because a feature that must land inside a narrow window fails more often. And it can dictate the whole process route — a part that would have been fine milled complete might now need grinding or a second op to reach the band. None of that is visible when you are looking at a single dimension line. It only shows up in the quote, as a number that surprises the buyer.
The drawing callouts that raise machining cost catalogue goes feature by feature through which specific notes drive price. The point for budgeting is structural: because each tight callout is cheap to add and expensive to make, a per-dimension habit systematically over-spends. The discipline of a budget — a fixed, small allowance of tight tolerances that you have to justify spending — is what counteracts that bias.
How to allocate: the method, step by step
Here is the concrete procedure we use when we read a drawing back to a customer and suggest where they could save. You can run the same steps at design time.
- Set the general tolerance in the title block. Choose ISO 2768-m (medium) for general machined work or -f (fine) for precision parts. This single note tolerances every dimension you do not otherwise call out, at no cost premium, because it lands within what standard machining holds anyway. See CNC machining tolerances for the full standard chart and what each class actually covers.
- Mark the functional interfaces. Go through the part and flag every feature where something physically interacts: a bore that takes a bearing, a shaft that mates a bore, a face that seals against an O-ring, a slot that locates a key, a datum surface that positions the part in an assembly. These are your spend candidates — and typically there are only a few per part.
- For each interface, derive the tolerance from the fit, not from habit. A bearing bore's tolerance comes from the bearing manufacturer's recommended housing fit, not from a number you like. A press fit comes from the interference you need. A clearance hole for a fastener needs almost nothing. Let the physics set the band; do not default to "tight because it matters."
- Run a stack-up on any dimension that lives in a chain. Where several features add up to a functional gap or fit — a shaft through two bores, a stack of shoulders setting an endplay — do the stack-up before you tighten anything. The method is covered in what is tolerance stacking; here you use it to find which single dimension in the chain most needs the tight band.
- Put the tight tolerance on the cheaper feature to hold. When the stack-up shows the variation can live on either of two features, choose the one that is cheaper to machine and inspect — usually an external or turned feature over a deep internal bore, an accessible face over a buried one.
- Open everything else up on purpose. Anything left on the general tolerance after steps 2–5 is a deliberate saving, not an oversight. If a dimension does not touch a fit, seal, bearing, datum or a stack that feeds one, it stays on ISO 2768.
The one move most engineers miss is step 5. It is worth its own section, because it is where a stack-up stops being an analysis exercise and becomes a cost lever.
Where the variation should live: putting tight bands on cheap features
A tolerance stack-up tells you how much total variation a functional requirement can absorb. What people forget is that it usually does not tell you which feature has to give up that variation — and that choice is yours to make on cost grounds.
Take a common case: a shaft has to sit at a controlled height above a base, set by a shoulder on the shaft and the depth of a counterbore in the housing. The endplay tolerance is the budget. You can hold it by tightening the shoulder length (an external turned feature, easy to cut and measure with a height gauge) or by tightening the counterbore depth (an internal feature, harder to machine to depth and slower to inspect). Both satisfy the stack-up. One is meaningfully cheaper to hold than the other. Budgeting means recognising you have that choice and spending on the cheap side.
The general rule of thumb from the shop floor: external and turned features are cheaper to hold tight than internal bores; accessible faces are cheaper than buried ones; a diameter is cheaper than a true-position pattern; a feature reached in the same setup as its datum is cheaper than one that needs a re-fixture. When a stack-up leaves you a choice, steer the tight band toward the cheap side of each of those pairs. When it does not leave you a choice — when the interface itself is the expensive feature — then you spend, and you spend without apology.
The cost-versus-tolerance curve, honestly
You cannot budget without a feel for prices. The relationship between tolerance and cost is not linear — it is closer to a hockey stick. Loosening a dimension from a general tolerance down to something merely sensible costs almost nothing. Tightening from general to ±0.05 mm on a critical feature is a modest step, well within standard milling and turning. But every factor-of-five you tighten below that tends to multiply the feature's contribution to the part cost, because you cross process thresholds: from milled-complete to a finishing pass, from finishing to grinding, from hand gauges to CMM, from accept-most to scrap-some.
The table below is qualitative on purpose — real numbers depend on the feature, material and quantity, and we confirm them at quotation rather than inventing them. But the shape is reliable, and the shape is what you budget against.
| Tolerance band | Typical process implication | Inspection | Relative cost / effort | Budget guidance |
|---|---|---|---|---|
| General (ISO 2768-m/-f) | Standard milling / turning, single pass | Hand gauges, sampling | Baseline | Default. Use for every non-functional dimension. |
| ±0.05 mm (critical feature) | Standard CNC, careful setup; Sendot standard on critical features | Calipers / micrometer, some CMM | Modest step above baseline | Spend freely on real fits and datums. |
| ±0.02 mm | Finishing pass, tool and thermal control | CMM, more first-article points | Noticeably higher per feature | Spend only when a fit or bearing requires it. |
| ±0.01 mm and tighter (specific features) | Grinding or dedicated ops, temperature-controlled; reachable on specific features, confirmed at quotation | Full CMM, 100% on that feature | Highest; can dominate feature cost | Reserve for the one or two interfaces that genuinely need it. |
Read the table as a budget menu. Most dimensions sit in the top row and cost you nothing. Your fits and datums sit in the second row and are cheap enough to be generous with. The bottom two rows are where a budget matters — those bands are worth spending on the interface that needs them and expensive to scatter across a drawing. To be explicit: some interfaces genuinely need ±0.01 mm, and on those the money is well spent. Budgeting is not about refusing to buy tight tolerance; it is about not buying it everywhere.
Worked example: budgeting a real part
Consider a small aluminium housing that carries a ball bearing at one end, bolts to a plate, and has a cover sealed by an O-ring. Strip it to the dimensions that carry function and you get roughly seven decisions. Here is how the budget gets allocated.
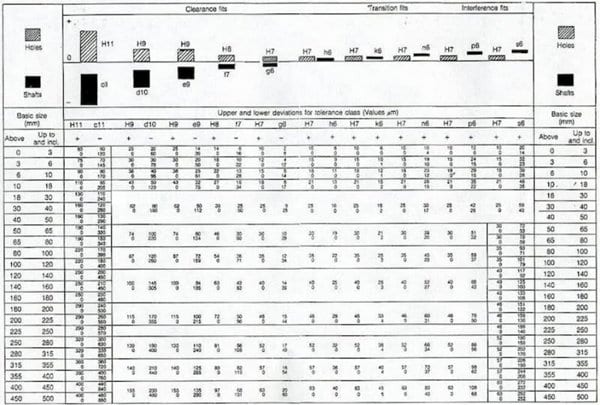
- Bearing bore diameter — SPEND. The bore takes a press-in bearing. Its tolerance comes straight from the bearing maker's housing fit table — typically an H7-class band, which lands near ±0.01 mm at this size. This is a real interface; it gets a tight, bespoke callout and no argument. Money well spent.
- O-ring groove diameter and depth — SPEND MODESTLY. The seal needs the right squeeze, so the groove dimensions come from the O-ring supplier's chart — tighter than general, but a ±0.05 mm-class band is usually plenty. Do not reflexively push these to ±0.01 mm; the seal does not need it.
- Bolt-hole pattern position — SPEND ON POSITION, SAVE ON SIZE. The holes must line up with the mating plate, so their true position matters and gets a position tolerance from the assembly. But the hole diameters themselves are clearance holes — leave them on the general tolerance. This is the classic split: tight where it locates, loose where it just clears.
- Bearing-bore-to-mounting-face distance — STACK, THEN CHOOSE. The bearing's axial position is a chain: bore shoulder depth plus face flatness plus plate thickness. Run the stack-up. It shows the endplay budget can be met by tightening either the internal shoulder depth or the external overall length. The external length is cheaper to hold and measure — put the tight band there and leave the internal shoulder on general.
- Overall height, width, non-mating faces — SAVE. None of these touches a fit, seal, bearing or datum. They stay on ISO 2768-m. Tightening them would add inspection and cost for zero functional gain.
- Cover flatness — SPEND LIGHTLY. The sealing face needs a flatness callout so the O-ring seats, but a general surface-finish and a modest flatness value carry it; this is not a ±0.01 mm decision.
- Cosmetic chamfers and radii — SAVE. General tolerance, or even a "break sharp edges" note. Never toleranced individually.
Out of seven functional areas, exactly one — the bearing bore — earns a truly tight band. Two more earn a modest tightening. The other four stay on the default. That is what a budgeted drawing looks like: a small, defensible list of tight callouts standing out against a background of general tolerance. The part costs a fraction of what it would if every dimension had been "made safe," and it works exactly as well.
Common mistakes that blow the budget
Even engineers who accept the budgeting idea trip on a handful of recurring errors. These are the ones we see most on incoming drawings.
- No title-block general tolerance. Without it, every unlabelled dimension is ambiguous, and a shop must either guess or quote the tightest reasonable reading. You lose the free default entirely. Always set ISO 2768-m or -f.
- Tightening the symptom, not the cause. When an assembly does not fit, the reflex is to tighten every dimension in sight. Run the stack-up instead — usually one dimension is doing the damage, and tightening only that one fixes the fit for a fraction of the cost.
- Putting the tight band on the expensive feature by default. Tolerancing the deep internal bore when the external length would have done the same job. Always ask which side of the stack is cheaper to hold.
- Copying tolerances from an old drawing. Inherited callouts carry inherited over-spending. A tolerance that made sense on last year's part may be pure cost on this one.
- Confusing surface finish with dimensional tolerance. A sealing face often needs a fine finish but only a modest dimensional band, or vice versa. Spend on the one the function actually requires, not both by reflex.
- Ignoring quantity. A tight tolerance you would accept on a one-off prototype becomes a scrap-rate problem at volume. Budget with the production quantity in mind.
Frequently asked questions
How many tight tolerances should a typical machined part have?
What general tolerance should I put in the title block?
When is ±0.01 mm actually worth it?
How does a stack-up help me decide where to spend?
Will a supplier tell me if my drawing is over-toleranced?
KEY TAKEAWAYS
- Treat tolerance as a fixed budget across the whole part, not a value set per dimension.
- Default every dimension to ISO 2768, then spend a tight band only on fits, seals, bearings and datums.
- Cost climbs like a hockey stick: general to ±0.05 mm is cheap; each step below multiplies feature cost.
- Use a stack-up to find the choice, then put the tight band on the cheaper feature to hold.
- Some interfaces genuinely need ±0.01 mm — spend there without apology, just not everywhere.
- Sendot holds ±0.05 mm on critical features and tighter on specific features confirmed at quotation.
Tolerance budgeting is the difference between a drawing that says "make it all good" and one that says "make these four things exact and the rest merely correct." The second drawing costs a fraction of the first and works just as well. Send us your STEP file and we will return a costed read-back of where your budget is spent — and where it does not need to be. Standard files: STEP preferred, plus IGES, X_T, DWG, PDF and STL; DXF for 2D laser parts. External references worth keeping open while you allocate: the ISO 2768 general tolerances standard, the ASME Y14.5 dimensioning and tolerancing standard, and NIST guidance on dimensional metrology for how those tolerances get verified.
Manufacturing next step
Apply this guidance to your part
Continue to the relevant service page for process scope and buyer inputs. If your design is ready, send the current files for engineering review and quotation.
Related manufacturing resources
Continue with the process or project stage most relevant to this topic: